True to their word, it's only a little blemish in the paint here or there.
Is it really 50% off? I couldn't find a comparable bike on the internet. There is actually not much out there about this bike at all. But I was drawn to that sweet Shimano Nexus 8 hub. And the one person who did seem to write about it at length in her blog, Jacqueline WayneGuite, really did a nice job. But that's it. Sure there's a forum posting here or there, but it's not much.
I received the bike. I went on to assemble it. OK, I'm not a bike mechanic. The bike was mostly assembled. But there was still quite a bit of work to do. I really should have documented the whole experience, but all I can offer you is what I have from memory. Now Bike Direct offers very little in the form of instructions. They do offer to sell you a video and some tools, but you actually already get the tools with the bike (at least when I bought mine) and the video seems to be a generic bike mechanics course of sorts; not specific to my bike, so not what I was looking for. So all you have left are those few instructions and some sample photos of the bike. That's lame. I don't know if there's much interest in more detailed instructions, so I won't break it down step by step (and it's too late anyway). But in an effort to reduce suffering in this world, I'll share what I've learned.
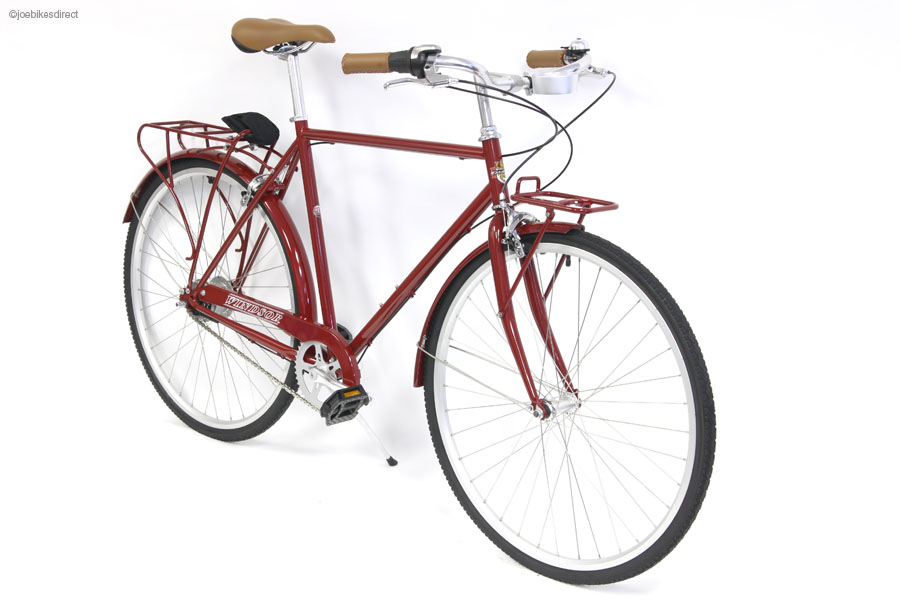
- Remember this picture (from Bikes Direct), as it is your only real source of information about what goes where on the men's bike (I really wish it were higher resolution) -
- The first thing you are told by the instructions is that you should install the front wheel first. You can if you want to, but you will need to remove it pretty much immediately. Why? Because you got a Windsor Kensington 8, which comes with the front rack and a front fender. You can't install those with the wheel in the way, so you should install both of those first. I hope you kept that plastic widget that protected the tip of the fork (called the dropout), otherwise you'll may be scraping the dropout on the floor, which is not a good thing to do.
- Might as well setup the stem and handlebars before you do anything. You don't need to tighten them yet, but it might give you more control over the fork to set it up.
- You will need to remove the front brake to install the fender and the front rack. My advice is to put on the fender first and then the rack. Install them one at a time onto the dropout first and then unscrew the brakes (you'll need a 5.5 allen wrench I think). Run the brake screw through the rack first and then the fender. Reinstall the brake, but don't tighten it until you put the wheel back. It should all look like their photo at Bikes Direct -
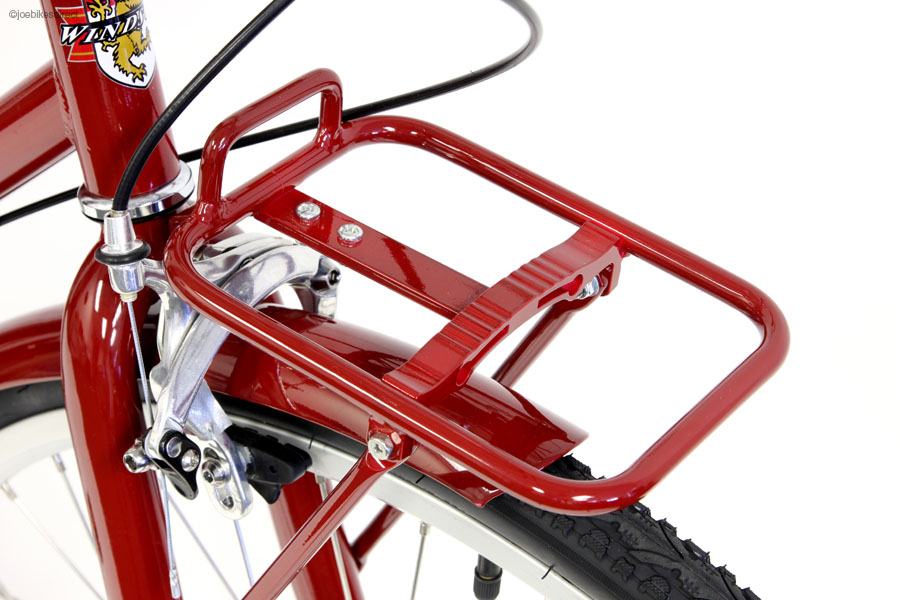
- After you put the wheel back, you can tighten and use your finger to make sure there's some space between the rim and the left brake pad (left if you are facing the bike, that's the side shown in the picture above)
- Install the pedals, those are easy.
- Install the bike seat. Easy.
- Make sure you got the right size bike by mounting it real quick. No riding of course, you still have a lot of work to do. But now you can make your final adjustments to your stem height, handlebar angle, and the alignment with the wheel.
- Setting up the front brakes is pretty easy. At the bottom of the left side, where the wire is coming from, close to the pad, is a little black part that actually flips up if you pull on it (I didn't not see this until an hour or two into this). You can then line up the groves on your left hand brake and install the wire. You can loosen the nut on the brake to pull out any slack on the brake line and then tighten it again (you'll need a 3mm and 4mm allen/hex wrenches to work with the brakes). Finally flip it down to make the wire taut and effective. Be sure to adjust the brake pads with a hex wrench so that the pads line up with the rim.
- Now you got to put in that back rack. You might actually want to avoid it if you don't really need it, esp. if you got a men's bike. Why? The stinking back brake obstructs the left side support (left if you are facing the bike from the rear). This is not a problem at all on the women's bike. Here's a pic from Bikes Direct -
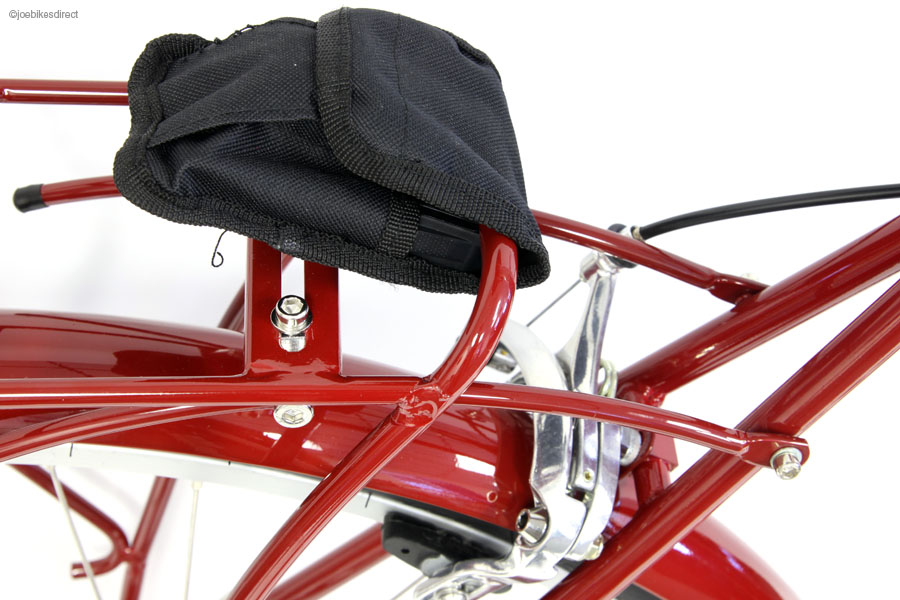
- I don't know if you can tell, but the top rail in the pic is right against the brake there.
- You have to put together a few pieces to that this setup working. First mount the rack to the rear wheel dropout.
- You can put together the pieces for the top connectors and screw them onto the rack (keep them loose), I think they face out in this pic. I
- think you should flip that little widget on the brake up so that you get some slack, because putting in the two rails is going to be tight. You can thread the rails through those connectors and then mount them to the frame. That left hand rail may be a challenge. As you can see in the picture, it goes through the inside of the brake, not the outside. Also, those connectors may scrape the paint on those rails a lot. I don't know how to prevent that, and I found out too late that they did that.
- To keep the rail from obstructing the break, set the rack to where you want it and then squeeze the two rails together on the end away from the frame. Tighten everything, the screws to the connectors, the screws connecting the rack to the frame. Flip down the brake to make it taut. Make sure that it works and that the rail is not keeping it pressed against the rim.
- Install the reflectors, these are plastic so they should not scuff up your finish (I hope).
- Install the bell, again plastic. Make sure it's in a good place for your thumb, probably by the left handle, like in the pic from Bikes Direct -
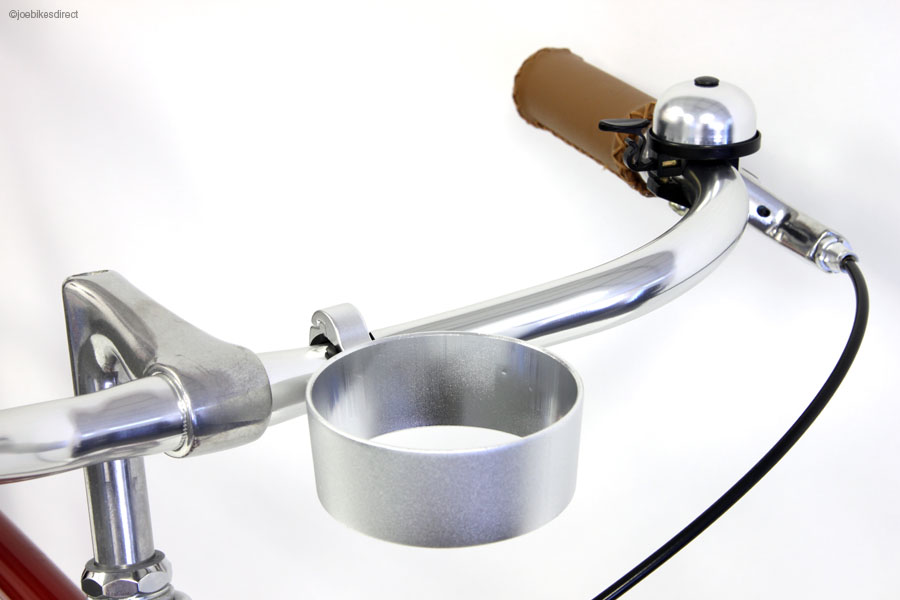
- OK, really think hard about whether or not you want that cup holder. If you really do, it is going to be a pain. Why? Because if you don't want it to scuff up your handlebars badly, you'll need to use those rubber strips included in the little box that the cup holder came in. If you zoom in on that picture above, you'll see black bits of rubber coming out from under that clamp. The clamp is in two parts that fit like a puzzle. And they never accounted for a protective rubber strip when making that puzzle. You will need massive grip strength to put a strip of rubber in between the metal and the clamps and then get that clamp to close together. I made the mistake of using two smaller pieces instead of a complete strip, figuring that it will close easier. It did, but I think my bar got scraped on the exposed part. Sigh, my loss is your gain. Now you know.
Now you should be done and can ride that sweet sweet bike. Despite the hours of work, figuring this stuff out, and bitching that I have to do this figuring out, I have to say it's a sweet deal to have one of these at the price you get them.
I hope it helps. Cheers.